Grow Number 9

July 14, 2014 - October 30, 2014

Strain:
Diamond OG (Indica)

Terminology

NOTEAll activity for each grow will now be tracked and recorded in the opening table. Occasionally an item is linked indicating additional text or pictures. The first six grow logs contained a considerable but necessary amount of anecdotal material but now that the grows are using a standardized procedure to produce a perpetual harvest (see below) only the basic vital statistics and stage of growth pictures need to be updated.

DATE
HEIGHT
ACTIVITY and Feeding Log
 DAY
Notes
7-14
4.0"
Started 2 Diamond OG clones in 1 gallon pots
1
Vegetation
7-19

Begin BioThrive Grow
8
Vegetation
7-26


15
Vegetation
8-2

Topped and began initial LST (training)
22
Vegetation
8-9


29
Vegetation
8-16

 LST suspended
36
Vegetation
8-23
6.0" - 7.5"
Both plants super cropped
42
Vegetation
8-28

Flipped lights. Began BioThrive Bloom
1
Transition
9-6
8.0" - 9.0"
Transplanted to #2 nursery pots
10
1st Flower
9-13
9.0"-10.0"

17

9-20


24

9-27

Day 30
31
Trichomes
10-4


38

10-11

All organic - no flushing needed
45

10-18


52

10-25

Early
59
Trichomes
10-30

Harvest
64

11-2

Hang dry until 25% of wet weight,  trim, cure in
glass jars with Boveda 62% humidity packs for 30 days minimum.


Perpetual Harvest:  Namaste Indoor Gardens consists of two separate growing areas: (1) the original area now dedicated exclusively to germination and vegetation under 112 watts vertical CFL with a supplemental 200 watt overhead CFL and (2) a  24" x 24" x 72" closet specifically repurposed for flowering under 250 watts HPS (high pressure sodium).

The vegetation area has two shelves. Two new plants are introduced every 30 days and placed on the lower shelf bumping any existing plants to the top shelf. After these new plants grow a total of 7 - 9 nodes and are around 6-8 inches tall they are topped to increase bushiness and begin low stress training (LST) . After a total of 30 or 60 days of vegetation and training they are moved to the closet where the lights are on a timer set for 12 hours on/12 hours off every 24 hours. This change in the photo period is what triggers the flowering cycle. After 60 days of flowering the two plants are ready for harvest.

This insures a harvest of two mature plants with a yield of at least an ounce and possibly more every 30 days. The California medical marijuana license allows for 6 mature (flowering) plants and 8 ounces of dried flowers.
This is considered an adequate amount for most patients.

July 14th: Week 1
(Vegetation)


Started 2 well rooted Diamond OG clones in 1 gallon pre moistened pots. These clones were taken from the mother plant early in June and have been vegetating for almost 30 days. They are at 6 nodes each.  

I was to receive them last week but the grower discovered spider mites which were treated and the clones were placed in quarantine for three days to make sure they were mite free.

7-17:  Plants are doing well following the transplant. Since they already have well established root balls I went ahead and topped both back to the 4th node. After those nodes grow out several more inches they will be bent over and restrained with wire tie downs forming a four arm cross only 4 inches tall. This insures that the plants grow as a stout bush with a flat top canopy so that each flower receives an equal amount of light. They will remain on the lower shelf for four weeks before being transferred to the upper shelf.


July 19th: Week 2 (Vegetation)

Nothing to report.


July 26th: Week 3 (Vegetation)

Nothing to report.


August 2nd: Week 4 (Vegetation)

Topped back to 4 nodes and began low stress training using soft wire stakes to spread and restrain those 4 nodes to horizontal growth.


August 9th: Week 5 (Vegetation)

Since the plants are still growing very slowly I have been giving them several hours daily of the more intense 200 watt overhead light.  Though they still haven't fully recovered from the topping last week there is some new growth.

When this season grows are completed I will replace the 8 HO T5 tubes in the vegetation chamber as they have been burning continuously since last September and will have accumulated over 10,000 hours.  All fluorescents degrade over time and these will have used nearly 50% of their 20,000 hour rated life cycle.


August 16th: Week 6 (Vegetation)

Nothing to report.


August 23rd: Week 7 (Vegetation)


Low stress training was suspended several weeks ago allowing the two plants to resume their vertical growth. They are now 6.0 and 7.5" in height. The expectation is that they will double in size after flipping the lights so that the final plants will have thickened stems and multiple branches with a final height of 12 - 16 inches.

8-25: Started a new production technique called super cropping which takes advantage of the cannabis plants reaction to broken limbs - it marshals all of its energy and redirects it to the injured area stimulating not only healing but also increasing the actual strength and carrying capacity of the limb itself.

It's done by bending and pinching to cause a minor internal tear in the cambium sheath which is immediately under the outer or epidermal layer. The only nodes not super cropped were the two new central terminals as I want the plants to continue growing vertically - each new node (branch) will produce its own large terminal flower and a number of additional but smaller nodes and flowers. These plants will be limited to just the first two flowers per node.


August 28th: Week 1 (Transition)

Both plants transferred to the flowering chamber to begin the transition period with first flowers expected to show in about two weeks. Currently they are at 12" below the overhead light due to the increased heat. I noticed that Grow #7 flowered successfully at that distance under an 150 watt HPS bulb and the current bulb is 250 watts.


September 6th: Week 2 (First Flower)


These two plants (front right and rear left) were transplanted to the larger #2 nursery pots as their root systems already completely fill out the #1 pots. The new soil was fairly moist so only added 1/2 cup water.

Have been encouraging their central leaders to assert dominance and start growing vertically again but there is the possibility that the transplant may delay the onset of flowering somewhat but the advantages of a larger root zone will more than make up for that.


September 13th: Week 3 (Flowering)


Plants are fully flowered with a total of approximately 40 bud sites. Have been retraining the central leaders to reassert apical dominance and it appears to be working with the two leaders having each put on an additional inch.  They were placed on inverted #2 nursery pots bringing them to within 8" of the overhead lights.


September 20th: Week 4 (Flowering)


Diamond OG Kush flowers at 23 days. Many new pistils in just the last couple of days as the flowers start to build and stack their calyxes (ovaries) - there are two pistils per calyx which are the external pollen receptors. 

This strain tends to an open canopy and doesn't require a lot of training to keep the developing buds spaced apart unlike the Bubba Kush plants of Grow #8 which are very compact and dense.


September 27th: Week 5 (Flowering)


These two plants have grown rather spindly and the branches break easily when being trained - lost another one yesterday while trying to work with it around all the other plants. Crowded conditions make for accidents and so the larger HGK plant was moved back to the (modified) flowering chamber.

9-29:


Here is an image of the developing calyxes and pistils - notice only just a few of the pistils have begun to mature and darken.  The trichomes are still quite immature and appear as a light dusting on the flowers and leaves.

9-30:


 Diamond OG: foreground right and rear left

Found this article on the advisability of removing most of the fan leaf after the 4th week of flowering on Kush strains. The claim is that the plant no longer needs them and they would have dropped off in nature by that time. Retaining them only drains nutrients better directed towards building flowers than leaf at that stage. The plant's nutrient needs can be met by the fully developed root system unlike a plant still in the vegetative stage.

Accordingly all the current plants, being Kushes, were "stripped to sticks with just a few fan leaves, but with all of the budding sites intact" as the article suggests. Added inverted paper plates as container covers to help retain soil moisture and reflect light up to underside of plants.


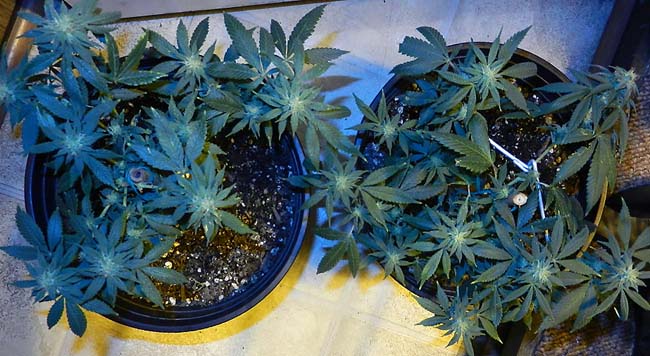
Here is a enhanced (Photoshop) image emphasizing the more exposed floral clusters resulting from the recent defoliation as seen from the overhead light.


October 4th: Week 6 (Flowering)

Currently in the middle of a heat wave with outside temperatures in the 80's to 90's through the weekend. Shifted all plants to the vegetation chamber and installed the A/C in the flowering chamber using the exhaust fan to vent the extra heat. Since the two chambers are on opposite sides of a  common hallway the doors between them are left open during the day making, in effect, one contiguous chamber.


10:00 am: Inside grow room temps over 86 already  and the A/C can no longer could keep up. All plants moved to the front of the coach under the surround windows and overhead fan which is just as acceptable and quite a bit more energy efficient.

With another fan and the outside door open plus a little cross ventilation the temps are 84F. This is their first exposure to direct sunlight ... will have to get a good light meter to see if the lumination equals that of the grow chambers.

Certainly there is enough light to carry the plants through the next couple of days.


October 11th: Week 7 (Flowering)


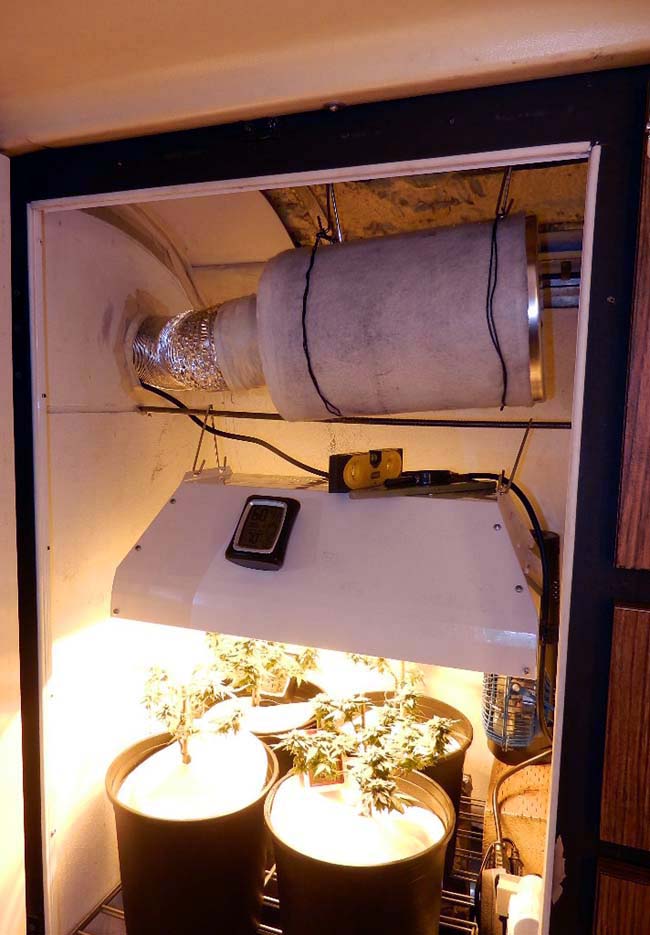
I was wondering why the flowering chamber heated up so fast even though the exhaust fan is 190 CFM (cubic feet per minute). Since the entire chamber is only 24 cubic feet the air supply should be refreshed at least 7 times per minute.

Reread the instructions and realized the carbon filter had been installed incorrectly. The filter is supposed to be in the chamber with the exhaust fan mounted downstream pulling air through it and venting outside the chamber. I had mounted both externally with the fan pushing the extracted air through the filter instead. The extra load on the fan reduced its efficiency and resulted in the heat build up.

Relocated the filter to the top of the flowering chamber in line with the vent opening suspended by bailing wire from the ceiling.  Before the next grow I will attach a vent tube to the outlet side of the external exhaust fan and route all the extracted heat out through the roof so that  will be removed from both the chamber and the coach. For the time being it vents near the ceiling in the rear bedroom and is removed by that room's 14" overhead fan.


October 18th: Week 8 (Flowering)


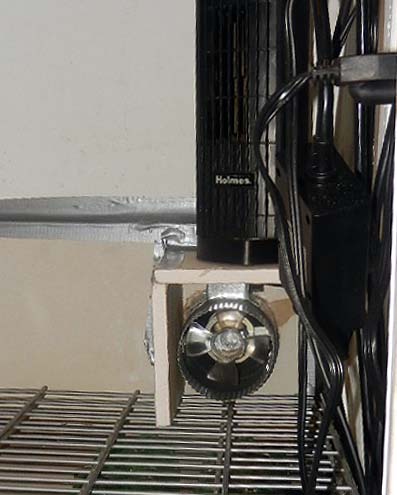
Added a 4" inline inlet fan to the flowering chamber to bring in cooler outside air using a cut down gym sock over the inlet side duct to filter out insects, dust and light.  

This unit was inexpensive and doesn't produce a lot of air movement ...40 CFM with a maxim boost of 80 CFM using an optional temperature activated switch which was also ordered but hasn't arrived yet.

The fan can be replaced by a more powerful fan if need be. 


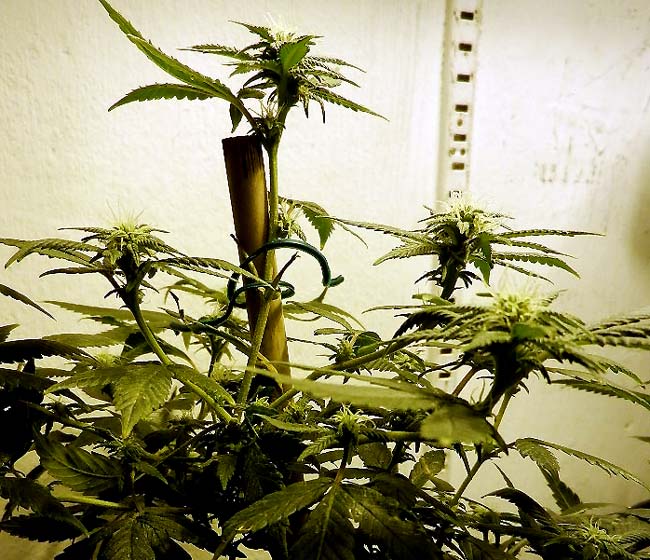
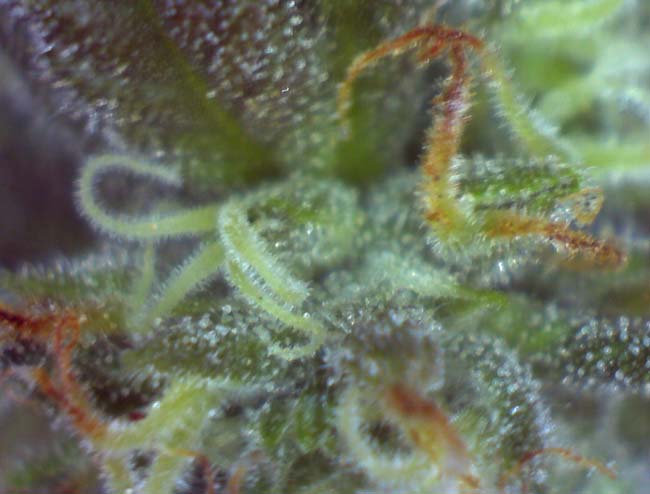
October 25th: Week 9 (Flowering)


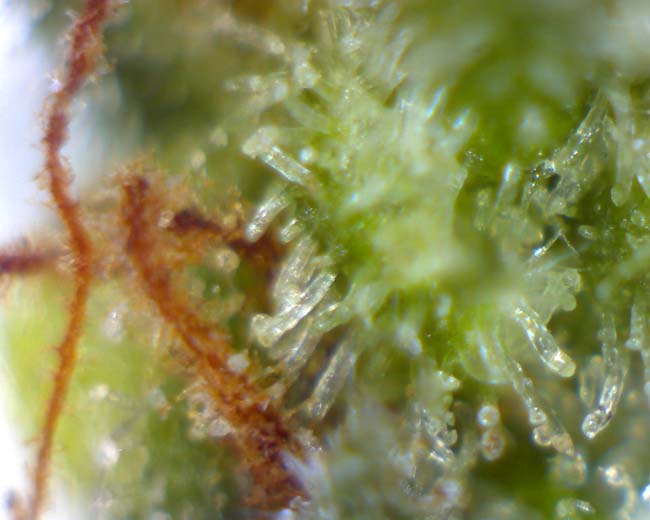
Here are the trichomes at 58 days - fully developed and turning opaque with resin. It would appear though they they will need another full week and perhaps then some to become completely mature and ready for harvest.

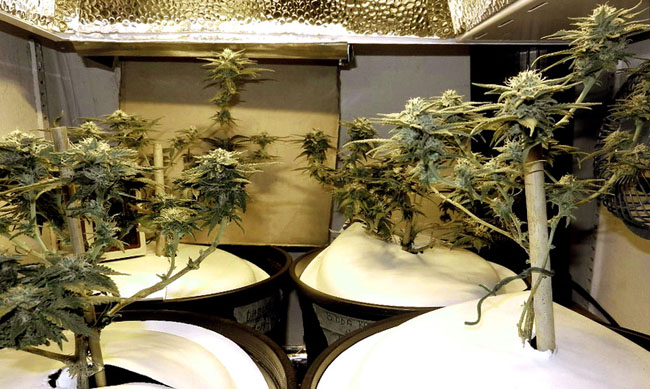
These are some of the smallest flowers I've grown yet - only 2 or 3 are more than 1.5 inches long and .75 inches in diameter. The majority of the buds are under 1 inch by .5 inch in diameter. They are well formed and moderately dense though with a pleasing odor.


October 30th:


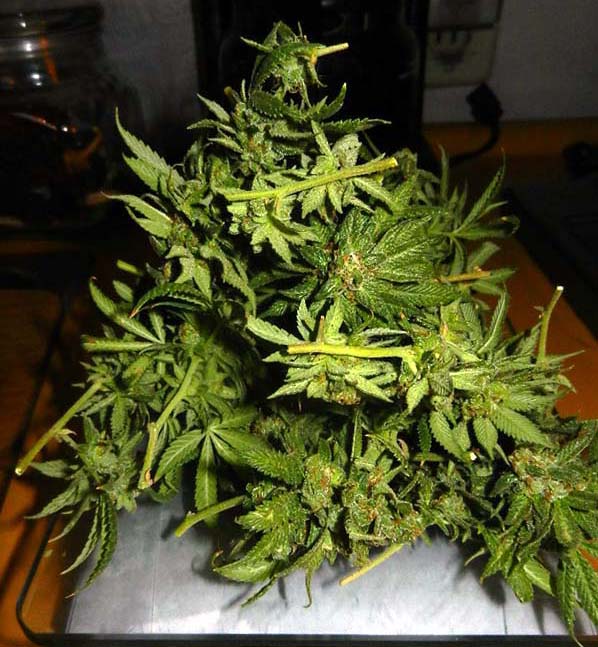
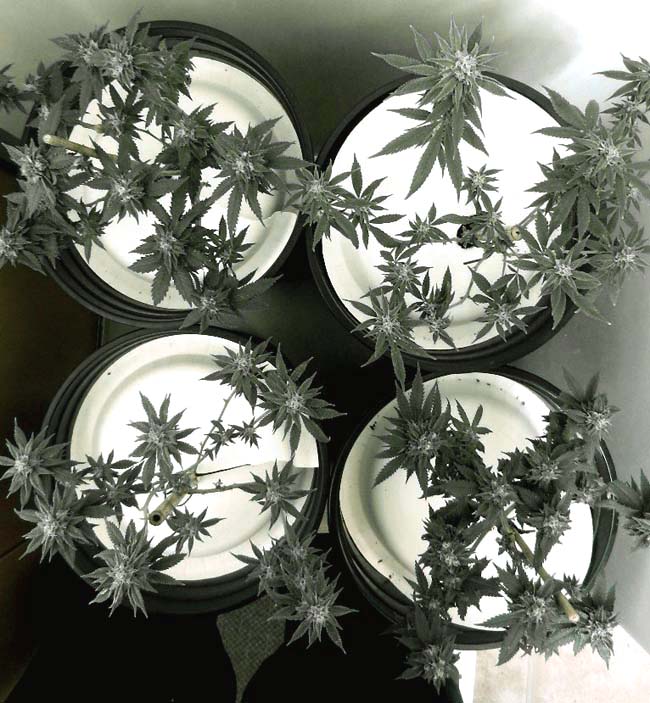
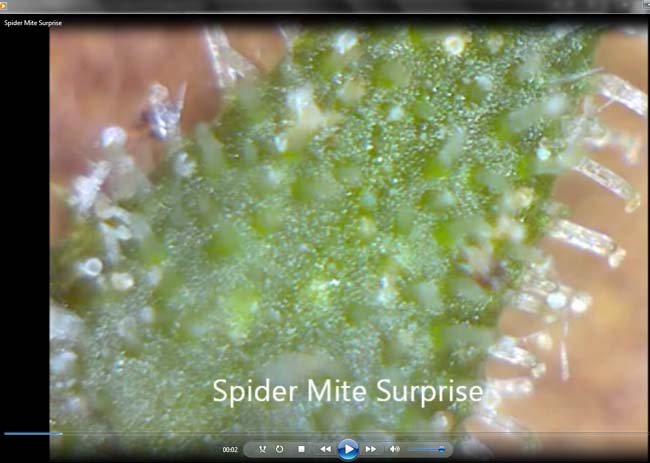
Decided to harvest these flowers today due to the approaching rain with its higher humidities and also because, in checking the trichomes, I discovered what looked like a few spider mites in the foliage.


Rather than spraying, the flowers were removed from the plant and microwaved for 60 seconds on high in the hopes of eliminating them. The flowers were then shaken over a paper plate and a second look under the microscope confirmed that all the dislodged bugs (maybe 5-10) were dead. Hopefully that took care of the problem but they will be observed over the next few days to make sure.

The total wet weight of the harvest was a disappointing 37 grams which should produce only 10 grams or so of dried and cured flowers. The 60 seconds in the microwave reduced that to 33 grams. The flowers will be dried over the next 5-7 days in a brown paper bag with a Boveda humidity pack in order to slow the process.

10-31: Down to 22 grams or 59% of the original wet weight. This size of this initial drop is due to the time in the microwave yesterday which resulted in a 4 gram reduction by itself. Otherwise it would have been only a drop to 70% which is consistent with the other grows.

11-1:  Down to 15 grams or 40% of the original weight wet.


November 2nd:  Curing


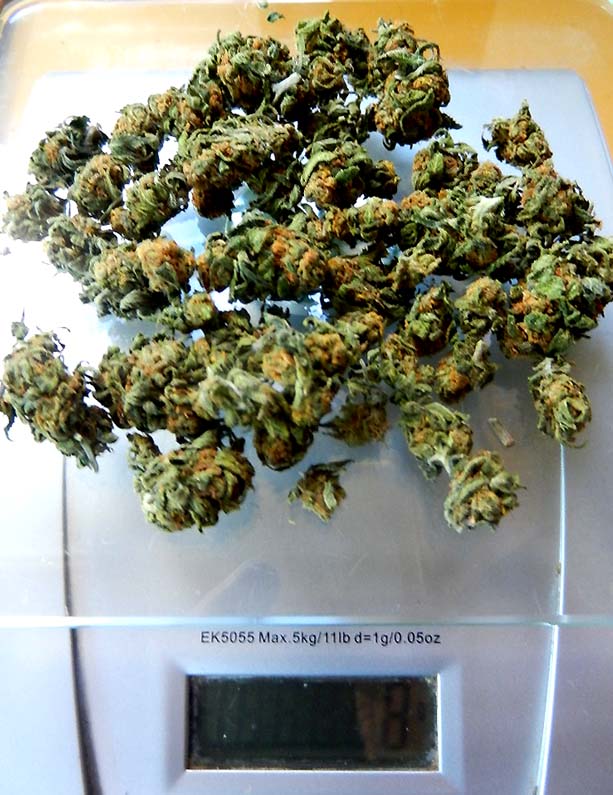
Down to 10 grams or 27% by late afternoon. Did the final trim and realized a full 8 grams or more than one quarter ounce. The buds were jarred with a Boveda humidity pack to begin their cure. The pack will keep the RH in the jar at the desired 62%.


Back to Top  

Copyright © 2013/2014 by Boyd Grant.  All Rights Reserved